
TL;DR
A strong profile picture edit should improve clarity, trust, and platform fit without changing the person. Prioritize crop, eye line, exposure, background cleanup, natural skin texture, clothing distractions, and export size before posting.
A professional profile photo gets judged before a resume, bio, or pitch deck gets read, so the edit needs to look polished without looking fake. This photo edit checklist for professional profile pictures gives job seekers, founders, freelancers, creators, and dating app users a practical review path before posting.
Professional profile picture edit: a controlled set of image adjustments that improves framing, lighting, color, clarity, and presentation while preserving a natural, accurate likeness.
The safest edits are quiet edits. Research on e-professionalism in health care found that online presentation can affect professional reputation and trust, especially when profiles blur personal and professional identity JMIR scoping review. For fast, polished headshot creation, Looktara helps turn ordinary photos into professional profile visuals while keeping the final image useful across career and brand channels.
Table of Contents
What should a professional profile picture edit fix first?
A professional profile picture edit should fix framing, eye line, exposure, color, background distractions, skin texture, clothing details, and export format in that order. This sequence prevents over-editing because structural issues get solved before cosmetic adjustments.
Competitor editing checklists often cover crop, white balance, exposure, sharpening, and distractions. A profile photo needs those basics plus platform fit, face visibility, and identity trust. A small LinkedIn avatar, a resume headshot, and a dating profile image all punish different mistakes.
Key rule: edit the photo for recognition first, polish second, and platform format last.
A checklist also reduces decision fatigue. The WHO Surgical Safety Checklist, published in 2008, is widely known as a reminder system for critical steps, not a replacement for expert judgment. Photo editing works the same way: the list catches missed basics before taste takes over.
Profile photo terminology that matters
- Crop: the visible frame around the subject, usually head and shoulders for professional uses.
- Eye line: the vertical position of the eyes in the frame, often strongest near the upper third.
- White balance: the color correction that keeps skin from looking too orange, blue, green, or gray.
- Clipping: loss of detail in very bright highlights or very dark shadows.
- Retouching: local edits to skin, hair, clothing, or background details.
- Export: the final file size, dimensions, and format used for each platform.
For career uses, a purpose-built option such as a resume headshot AI generator can reduce guesswork around framing and polish.
How should crop, eye line, and posture be checked?
Crop, eye line, and posture should be checked before color or retouching because they control how confident and readable the profile image feels. If the face is too small, tilted, or crowded, later edits cannot fully fix the first impression.
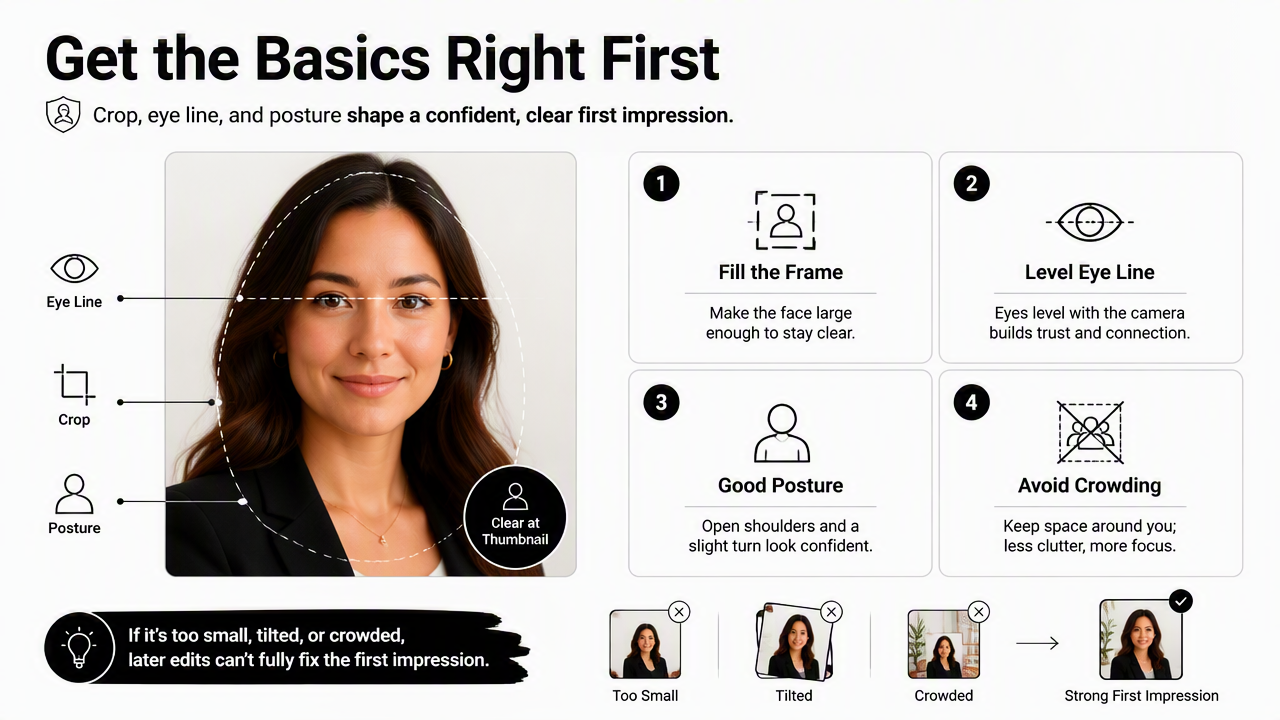
Start with the face occupying enough of the image to remain clear at thumbnail size. Most professional platforms display profile photos in small circles, so empty space above the head and cropped shoulders matter more than background scenery.
Use this order:
- Straighten the head and shoulders if the camera angle feels accidental.
- Crop to head and upper torso for LinkedIn, resumes, and business profiles.
- Keep eyes slightly above the center, near the upper third.
- Leave breathing room above the hair without making the face tiny.
- Check the circular crop preview before exporting.
- Avoid cutting through the chin, ears, or top of the head unless the crop is intentionally close.
A profile image used with a LinkedIn post generator should visually match the tone of the content around it. A warm founder post, a recruiter-facing update, and a consulting announcement may need the same face but different crops.
Crop review table for common platforms
| Platform or use | Best crop | Main edit priority | Common failure to catch |
|---|---|---|---|
| LinkedIn profile | Head and shoulders | Clear face at small size | Face too far from camera |
| Resume or CV | Tight headshot | Clean background | Overly casual crop |
| Business website | Chest-up portrait | Brand consistency | Mismatch with page design |
| Creator profile | Face plus personality cue | Recognition | Busy props or text behind face |
| Dating app | Natural upper-body crop | Approachability | Heavy filters or stiff pose |
A crop should never make the photo feel like a passport image unless the setting demands formality. Professional does not have to mean flat, centered, and expressionless.
How can exposure, color, and contrast look natural?
Exposure, color, and contrast look natural when the face has visible detail, skin tone looks believable, and the background supports the subject instead of competing with it. These edits should make the photo easier to read, not more dramatic.
Begin with exposure. The face should be bright enough to see the eyes and expression, while highlights on the forehead, cheeks, or shirt still hold detail. If the background is brighter than the face, darken or blur the background before brightening everything.
Then correct white balance. Indoor light often turns skin yellow, while shade can make skin blue. A neutral wall, white shirt, or gray object can guide the correction, but final judgment should stay on skin tone.
Contrast should define the face without hardening it. Too little contrast makes the image muddy. Too much contrast makes pores, under-eye shadows, and clothing wrinkles look stronger than they are.
Use this quick lighting pass:
- Lift overall exposure only until the eyes are readable.
- Reduce highlights if forehead or cheeks look shiny.
- Open shadows under the eyes, chin, and hairline.
- Warm or cool white balance until skin looks realistic.
- Add contrast lightly, then check the image at thumbnail size.
- Keep saturation modest, especially in lips, cheeks, and clothing.
Research by Dane and Bhatia on social media, body image, and young people shows why appearance editing should stay careful and realistic rather than extreme social media and body image review. A professional edit should support confidence without creating a face that looks unlike the person.
Before-and-after lighting checklist
| Edit area | Before check | Better after state |
|---|---|---|
| Face exposure | Eyes look dim or hidden | Eyes and expression are easy to read |
| Highlights | Skin or shirt loses detail | Bright areas keep texture |
| Shadows | Under-eye area looks heavy | Shadows are softer but still natural |
| White balance | Skin looks orange, blue, or green | Skin tone looks believable |
| Contrast | Image looks flat or harsh | Face has shape without hard edges |
The Looktara platform is useful when a profile photo needs a cleaner, career-ready look without spending hours adjusting sliders. For broader brand consistency, the same visual direction can extend to a website hero image so headshots, landing pages, and social profiles feel connected.
What retouching keeps a profile photo credible?
Credible retouching removes temporary distractions while keeping permanent identity features intact. A polished professional profile photo can soften a flyaway hair, reduce lint, and clean a background, but it should not erase skin texture, reshape facial features, or create plastic-looking skin.
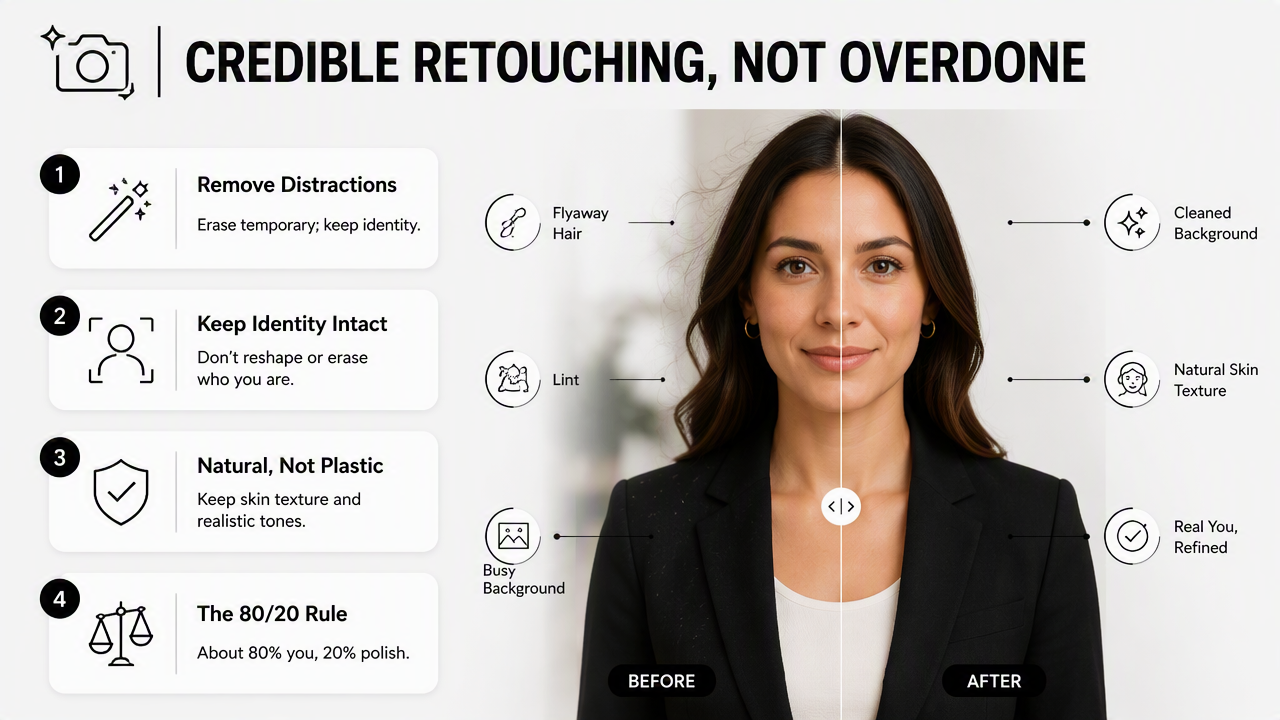
A practical rule is simple: remove what would not normally be present next week. That includes a blemish, stray thread, dust spot, or harsh shine. Keep moles, freckles, face shape, smile lines, and natural texture unless there is a specific privacy or medical reason.
Retouching also applies to clothing and background. Wrinkled collars, bright logos, messy shelves, and strong wall lines can draw attention away from the face. If a distraction is near the eyes or mouth, it is worth fixing first.
Use a three-level retouch pass:
- Clean: remove lint, dust spots, sensor marks, and temporary blemishes.
- Soften: reduce shine, harsh under-eye shadows, and strong background edges.
- Preserve: keep skin pores, facial structure, hairline, and expression believable.
Avoid edits that make the face look detached from the lighting. Skin that is smoother than the neck, hands, or background instantly signals heavy retouching.
A strong profile edit should make the viewer notice the person, not the editing.
For founders and consultants, visual consistency also matters outside the headshot. A clean portrait can pair with branded assets such as a business logo generator or pitch materials, but the face should remain the most human part of the brand.
Distraction audit before final export
- Check the background for bright objects, door frames, plants, screens, and clutter.
- Scan clothing for lint, wrinkles, logos, stretched collars, and uneven buttons.
- Inspect hair edges for flyaways that break the silhouette.
- Look around the eyes for mascara flakes, glare, or uneven shadows.
- Review teeth and lips for color casts, dryness, or sharpening artifacts.
- Zoom back out after every local edit to confirm the face still looks natural.
A dating app photo may allow more personality in clothing or setting, while a board bio or job application usually benefits from a quieter background. The checklist stays the same, but the tolerance for informality changes.
How should the final file be exported and reviewed?
The final profile picture should be exported in platform-ready dimensions, checked at thumbnail size, reviewed on both light and dark backgrounds, and saved as a high-quality JPEG or PNG. Final review catches problems that are invisible while editing full screen.
Most profile photos are viewed small, cropped into circles, and surrounded by interface colors. A perfect full-size portrait can fail when the forehead is clipped in a circular avatar or the dark jacket disappears on a dark app background.
Before posting, create a final approval pass:
- Export a square version for profile platforms.
- Preview the circular crop.
- Check the image at phone size and desktop size.
- View it on white, gray, and dark backgrounds.
- Confirm eyes remain sharp after compression.
- Save a master file separately from platform exports.
- Name files clearly, such as
firstname-lastname-linkedin-headshot.jpg.
For creators, the profile image often sits beside covers, thumbnails, and social graphics. A polished headshot can be matched with a podcast cover AI generator or a short-form video asset such as a TikTok cover generator for a more consistent public presence.
Looktara can support that final consistency step when a person needs several professional profile assets from one visual direction. More examples and tools are available at looktara.com.
FAQ: profile picture editing questions
What is the best order for editing a professional profile picture?
The best order is crop, straighten, exposure, white balance, contrast, distraction cleanup, light retouching, sharpening, and export. This order fixes structure before style. It also prevents a common problem where heavy retouching hides the fact that the crop, lighting, or background still feels wrong.
How much skin retouching is acceptable for a headshot?
Acceptable skin retouching removes temporary issues and reduces harsh lighting while keeping real texture. Blemishes, lint, glare, and flyaway hairs are fair edits. Face reshaping, pore removal, extreme smoothing, and artificial eye brightening usually reduce credibility because the photo starts looking filtered instead of professional.
Should a profile picture have a blurred background?
A blurred background works well when it separates the face from clutter and keeps attention on expression. The blur should look optically believable, not like a cutout. Plain walls, office spaces, outdoor shade, and soft brand-color backgrounds can all work if the face remains the clearest part.
What file type is best for LinkedIn or resume headshots?
JPEG is usually practical for LinkedIn, resumes, and business profiles because it keeps file size manageable while preserving enough quality. PNG can work for sharper graphics or transparent design uses. A square export with a separate high-resolution master file gives the most flexibility across platforms.
Can AI-generated profile pictures look professional?
AI-assisted profile pictures can look professional when the output preserves a realistic likeness, natural skin texture, and platform-appropriate styling. The best results still need human review for eye shape, hands, clothing details, and background realism. A checklist helps decide whether the final image feels trustworthy enough to publish.
Conclusion
A reliable photo edit checklist for professional profile pictures keeps the process simple: fix the frame, make the face readable, clean distractions, preserve natural identity, and export for the platform where the image will appear. The goal is not a flawless face; the goal is a clear, credible, and current presentation.
The next step is practical. Select one profile photo, run it through the checklist section by section, then compare the final image at thumbnail size against the current profile image. If a faster branded result is needed, head to looktara.com and create a polished profile-ready visual with Looktara before updating LinkedIn, resumes, creator profiles, or business pages.
Generated by EarlySEO.com