
TL;DR
GIMP works best before AI headshot generation when it is used for light preparation, not heavy retouching. Crop, straighten, brighten, remove distractions, then export clean, natural images so the AI system receives consistent facial detail.
Small edits before upload can decide whether an AI headshot looks polished or strangely artificial. GIMP photo editing software for AI headshot preparation gives job seekers, founders, freelancers, creators, and dating app users a free way to clean source images before sending them to an AI generator such as Looktara. The goal is simple: make the input photo clearer while keeping the face authentic.
Table of Contents
What is GIMP photo editing software for AI headshot preparation?
GIMP photo editing software for AI headshot preparation is the use of GIMP to crop, straighten, brighten, and lightly clean source portraits before an AI headshot generator processes them. GIMP is best used as a preparation tool, not as a face-changing retouching app.
GIMP: The GNU Image Manipulation Program, commonly written as GIMP, is a free and open-source raster graphics editor, according to Wikipedia.
The official GIMP website describes GIMP as a free and open-source image editor available for GNU/Linux, macOS, Windows, and other operating systems. That cross-platform access makes it practical for remote workers, students, solopreneurs, and small teams that need clean source images without paid software.
Key insight: AI headshot quality usually improves when the input image is clearer, straighter, and more evenly lit, but worsens when the face is heavily altered before upload.
GIMP also supports broader creative work, including high-quality photo manipulation, original artwork, graphic design elements, and programming workflows, as listed by the official project site. For headshot preparation, only a small slice of those tools matters: crop, rotate, exposure, color, healing, clone, and export.
Which source photos are best before AI headshot generation?
The best source photos for AI headshot generation show the face clearly, use natural lighting, avoid heavy filters, and include enough background space for cropping. A strong upload set should include several expressions and angles while keeping the same person easy to identify.
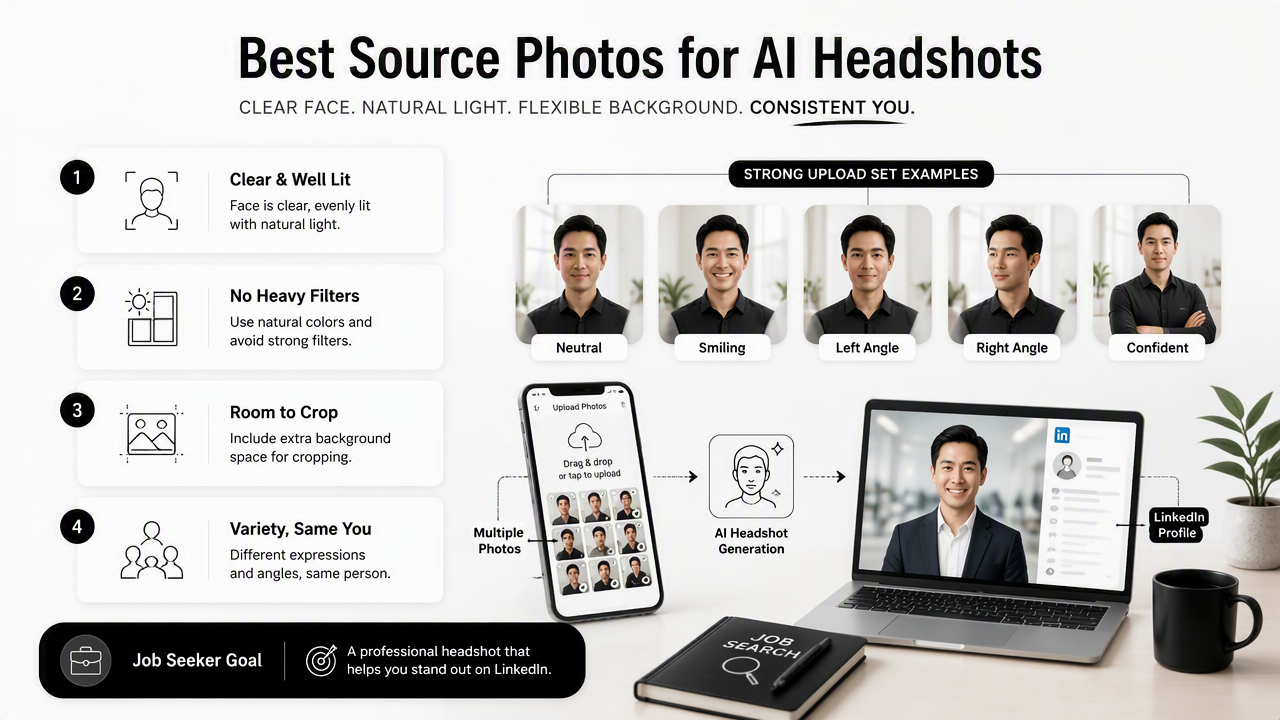
A job seeker preparing a LinkedIn profile photo needs different polish than a creator preparing social images, but the source-photo rules stay similar. The AI system needs stable facial information: eyes visible, skin texture present, head not cut off, and no extreme blur.
GIMP helps fix framing and small distractions, but it cannot fully rescue poor source quality. A dark, pixelated, heavily compressed selfie still limits the final result, even after careful editing.
Source-photo readiness checklist
| Checkpoint | Good input | Fix in GIMP |
|---|---|---|
| Face visibility | Both eyes visible, no sunglasses | Crop closer, reject blocked faces |
| Lighting | Even light across the face | Use Colors > Exposure or Brightness-Contrast lightly |
| Angle | Front or slight turn | Straighten with Rotate Tool |
| Background | Simple, not crowded | Crop distractions or use Heal Tool |
| Sharpness | Natural detail in eyes and hair | Reject strong blur instead of oversharpening |
| Expression | Relaxed and professional | Keep natural expression, avoid face reshaping |
For career use, the upload set should favor steady, professional images. For example, candidates building resume or LinkedIn visuals can move from prepared images into a dedicated LinkedIn and resume headshot generator after the GIMP cleanup stage.
Good variety also matters. A set with one harsh flash selfie, one dim webcam frame, and one old filtered photo gives the model mixed signals. Better source sets use consistent identity cues across different settings.
How to edit a headshot source photo in GIMP?
To edit a headshot source photo in GIMP, follow a short order: crop first, straighten second, adjust brightness third, clean distractions fourth, then export a high-quality copy. This keeps the workflow simple and avoids edits that confuse AI headshot generation.
- Open the image in GIMP and duplicate the layer.
- Crop for head-and-shoulders framing.
- Straighten tilted lines with the Rotate Tool.
- Brighten gently with exposure or curves.
- Clean background distractions with Heal or Clone.
- Export as a high-quality JPEG or PNG.
Start with File > Open, then create a duplicate layer using Layer > Duplicate Layer. The duplicate keeps the original available for comparison. That comparison matters because preparation edits should make the source clearer, not turn it into a different-looking person.
Use the Crop Tool to remove extra ceiling, clutter, or empty wall space. A head-and-shoulders crop works well for most professional headshots because it preserves face shape, hair outline, shoulders, and posture cues.
Straightening comes next. A slightly tilted selfie can make an AI output feel less formal. The Rotate Tool can correct a lean by using eyes, door frames, shelves, or horizon lines as visual guides.
Brightness edits should be subtle. Colors > Exposure, Colors > Curves, and Colors > Brightness-Contrast can lift shadows, but skin should still show texture. If highlights on the forehead or cheeks are already blown out, lowering brightness may not restore missing detail.
Clean small distractions last. The Heal Tool works for tiny background marks, dust, or wall spots. The Clone Tool can cover simple background clutter, but it should not be used to reshape the jaw, change the nose, widen the eyes, or smooth skin until texture disappears.
Best workflow: fix the photo around the face first, then make only light global corrections to the face itself.
Creators and entrepreneurs who need profile images plus product or brand visuals often prepare inputs in batches. After simple cleanup, a tool built for LinkedIn and product photo generation can help maintain a more consistent visual presence across professional channels.
What should not be edited before uploading?
The source image should not be heavily retouched before upload because aggressive edits can remove the facial signals an AI headshot generator needs. Avoid face reshaping, plastic skin smoothing, extreme sharpening, artificial eye changes, and filters that alter natural color.
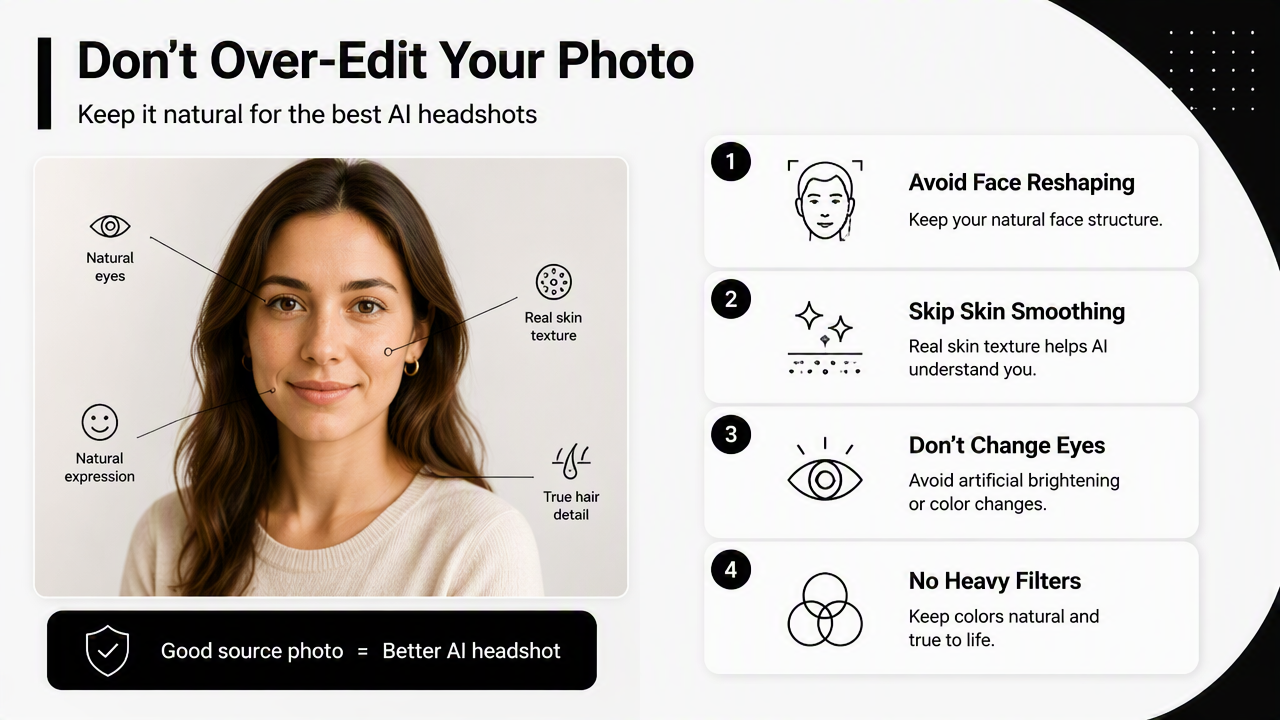
Over-editing is tempting because GIMP has powerful tools. Still, AI systems usually need realistic identity information more than a perfect-looking upload. A slightly imperfect but clear face is often more useful than a polished image with missing skin texture or changed proportions.
Common mistakes include:
- Skin blurred too much: pores, lines, and natural texture disappear.
- Eyes sharpened unnaturally: the face can look edited before generation begins.
- Jawline reshaped: final images may drift from the real person.
- Heavy color grading: skin tone can become inconsistent across uploads.
- Background replaced poorly: edges around hair may become confusing.
- Low-resolution export: compression artifacts may get carried into the final output.
A simple rule helps: if an edit would make a colleague question whether the photo still looks like the same person, the edit has gone too far. AI headshot prep should improve clarity, not identity.
GIMP also should not be treated as a substitute for source selection. If several photos are blurry, cropped through the chin, or covered by hats and sunglasses, selecting better originals is faster than trying to repair weak inputs.
What happens after GIMP preparation?
After GIMP preparation, the edited photos should be reviewed as a set, exported cleanly, and uploaded to an AI headshot platform that can create professional-looking variations. The strongest results come from natural source images with consistent identity details and enough variety.
A polished upload set can then move into the Looktara platform for AI headshot generation. Looktara fits the step after GIMP because GIMP prepares the raw images, while the generator creates finished headshot options for profiles, resumes, founder pages, creator bios, and public-facing accounts.
Export settings should stay simple. A high-quality JPEG is usually practical for portraits, while PNG can work when file size is not an issue. File names also help with organization, such as front-natural-light.jpg, slight-angle-office.jpg, and outdoor-soft-light.jpg.
The final review should check consistency across the set:
- The same person is clearly recognizable in every image.
- Lighting differences are not extreme.
- No source photo contains heavy beauty filters.
- Crops include the full head and enough shoulder area.
- Exports are not compressed into tiny files.
Professionals building a public image across stores, resumes, and social profiles can also use a broader Shopify and resume headshot workflow when commercial presentation matters. The preparation principle stays the same: clean input first, generated output second.
For the next step, prepared images can be uploaded with Looktara, then reviewed for role fit. A corporate job search may need a conservative background and formal styling. A founder profile may need warmer lighting and a more approachable look.
FAQ
These quick answers cover the most common GIMP and AI headshot preparation questions for 2026 workflows.
Can GIMP improve AI headshot results?
GIMP can improve AI headshot results when it is used for basic cleanup: cropping, straightening, brightness correction, and distraction removal. It cannot guarantee better outputs if the original photos are blurry, heavily filtered, or too small. Better source selection still matters more than complex editing.
Is GIMP better than a phone editor for source photos?
GIMP is better than many phone editors for careful preparation because it gives more control over layers, healing, rotation, cropping, and export quality. A phone editor can work for quick brightness and crop fixes, but GIMP is stronger when a source set needs consistent treatment across several images.
Should skin be retouched before AI headshot generation?
Skin should only be lightly corrected before AI headshot generation. Small blemish cleanup is usually fine, but heavy blur or smoothing can remove useful facial detail. Natural texture helps the generated headshot stay believable and closer to the real person.
What file type should be exported from GIMP?
A high-quality JPEG is usually the most practical export format for AI headshot source photos because it balances image quality and file size. PNG is also acceptable when file size is not a concern. Very compressed files should be avoided because artifacts can affect the generated result.
Conclusion
GIMP photo editing software for AI headshot preparation works best as a light cleanup step: crop for a clear head-and-shoulders frame, straighten tilt, brighten gently, remove small distractions, and export a clean file. The safest standard is authenticity. The face should look clearer, not different. After a prepared set passes that test, the next practical step is to generate finished options with Looktara. For a fast start, prepare 6 to 10 clear images in GIMP, keep edits natural, then visit looktara.com and compare the final headshots against the intended profile, resume, or brand use.
Generated by EarlySEO.com